GE Front Load Washer Service mode
GE front load washer repair can be tricky; however, this page is here to help.
The way these washers are designed it is almost impossible to diagnose them
without placing them in the service mode. In the service mode you have total
control over the washer so that you can test components such as the motor, pump,
inverter, water valve and others. Also while in the service mode, you can view
error codes that are sometimes vital to accurately diagnose problems with these
washers. This page will explain how to use the service mode to assist with GE
front load washer troubleshooting.
Entering And Exiting The Service Mode
Follow these steps to enter the service mode on a GE front load washer.
1. Close the door.
2. Clear current cycles by pressing the power
button. Make sure the screen is blank before attempting to enter the service
mode.
3. Disconnect power to washer for at least 30 seconds.
4.
Reconnect the power and within 30 seconds of reconnecting power complete the
next step.
5. Press signal -delay start -signal - delay start.
Note: Entering the service mode is a little
different on models GFWN1000, GFAN1000,GFWN1100, and GFAN1100. To enter the
service mode on these models press signal, extra rinse, signal and extra rinse.
Press the same button sequence to exit the service mode.
If you
successfully enter the washer into the service, mode t01 will be displayed and
the door will lock.
Never disconnect the power to the washer while it is in the
service mode. Doing so may result in a damaged control board.
To exit the service mode press signal -delay start -signal- delay start.
Test modes
t01
When you enter the service mode, t01 is displayed. This test mode has no diagnostic purpose. The main board is designed to work on multiple models and this mode is for setting the model. For the most part, you shouldn’t have to worry about this test mode when diagnosing. To enter this test mode, press start/pause and to exit press power.
t02
Error Codes Test Mode
To enter the error code test mode on a GE front load washer, rotate the
control knob until t02 is displayed in the control panel then press start/pause
to enter the test mode. This is where all error codes are stored. Once you have
entered the test mode, you will see the most recent error code that the control
has flagged. If you press start/pause you will see the next recent error code.
If you continue to press start/pause you can view up to the ten most recent
error codes. Most of the time there will be only one or two.
Once you
have diagnosed the washer it is very important to clear the error codes. If you
don’t clear the error codes, when you have another problem the old error codes
will still be there from an issue that has been resolved. To clear the error
codes press and hold start/pause. Press power to exit this test mode and the
display should go back to t02.
For a full list of error codes see this page GE Front Load Washer Error Codes
t03
This test mode simply displays software revision numbers. This has no diagnostic purpose.
t04
LED And Buttons Test Mode
To enter the LED and buttons test mode on a GE front load washer, rotate the control knob until t04 is displayed in the control panel then press start/pause to enter the test mode. This test mode will test to see if each button works and each LED will light. Each light should blink once in a loop. To test the buttons, press each button and if the control senses that the button has been pressed, you will hear a beep. If you do not hear the beep, the button is broken and you will have to replace the main control. Press power to exit this test mode and the display should go back to t04.
t05
Water Pump Test Mode
To enter the water pump test mode, rotate the control knob until t05 is
displayed in the control panel then press start/pause to enter the test mode.
Once you have entered the test mode, “P” will be displayed and the pump will run
for 60 seconds. After 60 seconds it will return to t05. To exit this test mode
early, press power to return to t05.
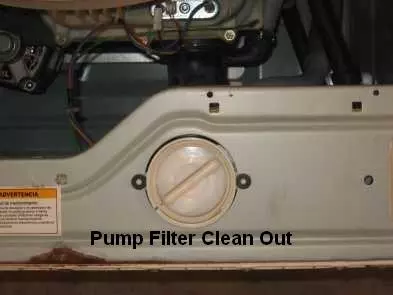
If the washer will not pump out the first thing you should do is remove the
bottom panel to access the pump clean out and then clean out the pump.
t06
Water Lever Control Test Mode
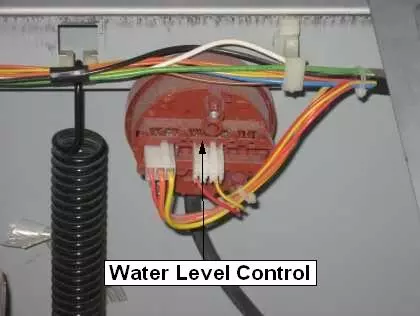
To enter the water level control test mode on a GE front load washer, rotate
the control knob until t06 is displayed in the control panel then press
start/pause to enter the test mode. This test has five steps as described below.
Once you start the test, the water pump will begin to run and “E” will
be displayed in the control panel. The “E” being displayed means that the tub is
empty. If the tub is empty, but “E” is not displayed then the water level
control is bad.
Press start/pause to advance to the next level of the
test. At this point the water will begin to run. When the water level in the tub
reaches the foam level, “F” will be displayed in the control panel and water
will stop running. Foam water level is about ¾ of an inch in the wash basket.
Press start/pause to advance to the next level of the test. Water will
start to run again and when the tub reaches the main level, “nl” will be
displayed in the control panel and the water will stop running. The main water
level is about 2 ½ inches of water in the wash basket.
Press start/pause
to advance to the next level of the test. Water will run until overflow water
level is reached. Once the overflow level is reached, “oF” will be briefly
displayed in the control panel. Overflow is approximately 6 inches above the
door opening.
Soon after the overflow water level is reached, the water
pump will energize and pump the water out. Once the tub is empty again, “E” will
be displayed again. Pressing power anytime during the test mode will exit the
test mode.
t07
Water Heater Test Mode
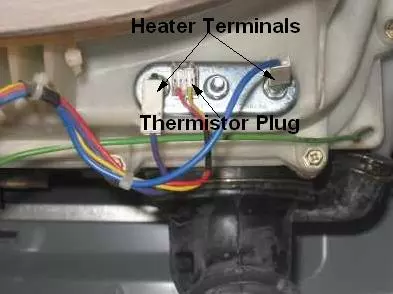
To enter the water heater test mode on a GE front load washer, rotate the control knob until t07 is displayed in the control panel then press start/pause to enter the test mode. Once this test is entered, the washer will start to fill with water until the main water level is reached. Once the washer is filled to the main water level, the heater will come on and start to heat the water for five minutes. During this time, the temperature of the water will be displayed in the control panel. You should see the temperature steady rise if the heater is working. Once the five minutes is up the water pumps out and will automatically exit this test mode. Pressing power anytime during the test mode will exit the test mode.
t08
Hot Water Valve Test Mode
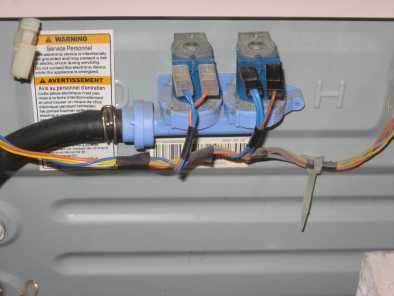
To enter the hot water valve test mode on a GE front load washer, rotate the control knob until t08 is displayed in the control panel then press start/pause to enter the test mode. This is the hot water valve test mode. Once this test mode is entered, “hOt” will be displayed in the control panel and the hot water will start to run. Hot water will continue to run until the main water level is reached or you press power to exit the test mode. If the main water level is reached before the test mode is terminated, the washer will pump the water out and return to t08.
Note that some GE front load washer models do not have this
test mode. This can be a little confusing because you can rotate the knob until
t08 is displayed; however, when you press start/pause you hear two beeps and the
display continues to display t08.
t09
Cold Water Valve Test Mode
To enter the cold-water test mode on a GE front load washer, rotate the control knob until t09 is displayed in the control panel then press start/pause to enter the test mode. This is the cold-water valve test mode. Once this test mode is entered, “Cld” will be displayed in the control panel and the cold water will start to run. Cold water will continue to run until the main water level is reached or you press power to exit the test mode. If the main water level is reached before the test mode is terminated, the washer will pump the water out and return to t09.
Note that some GE front load washer models do not have this
test mode. This can be a little confusing because you can rotate the knob until
t09 is displayed; however, when you press start/pause you hear two beeps and the
display continues to display t09.
t10
Tumble Test Mode
To enter the tumble test on a GE front load washer, rotate the control knob until t10 is displayed then press start/pause to enter the test mode. Once the test mode is entered, “tt” will be displayed in the control panel and the spin basket will start to tumble in one direction for 5 seconds then reverse and tumble for 5 seconds in opposite direction. This will repeat continually until you exit the test mode by pressing the power button.
t11
Spin Test Mode
To enter the spin test on a GE front load washer, rotate the control knob until t11 is displayed then press start/pause to enter the test mode. Once the test mode is entered, the tub will start to spin and the rpm will be displayed in the control panel. When you first enter the test mode, the spin basket will ramp up to 400 rpm. If you press start/pause a second time the spin basket will ramp up to 1000 rpm. Since some displays can only display three digits you may see 999 or 0 in the display when the spin basket reaches 1000 rpm.
t12
Dispenser Motor Test Mode
Before I talk about the dispenser motor test, I will explain the dispenser
system. Most GE front load washer models have a dispenser. The dispenser has 4
positions and the dispenser motor switches the dispenser to each position by
rotating a water diverter in the correct position. On the top of the dispenser
there are four numbers that represent each position. You should also see the
dispenser and an arrow. When the motor rotates, the arrow moves as well as the
diverter (you can’t see the diverter) to the position that it needs to be in
according to which cycle the washer is in.
Position 1 corresponds to the
pre-wash dispenser function.
Position 2 corresponds to the wash
dispenser function.
Position 3 corresponds to the bleach dispenser
function.
Position 4 corresponds to the fabric dispenser function.
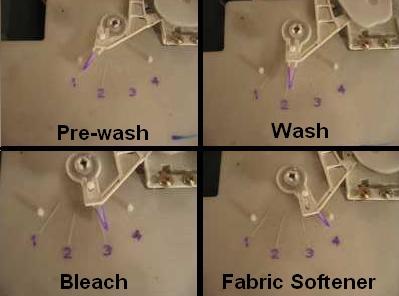
This test mode is used to test the dispenser motor.
To enter the dispenser motor test mode on a GE front load washer, rotate the
control knob until t12 is displayed then press start/pause to enter the test
mode. Once the test mode is entered, the display will display “Pdt” and the
dispenser motor will rotate the dispenser until the arrow is pointing to 1 and
the washer will start to fill in the pre-wash compartment.
Press
start/pause to advance to the next level of the test. Once done, the dispenser
will turn to the number 2 position, “ddt” will be displayed in the control panel
and water will start to fill in the wash compartment.
Press start/pause
to advance to the next level of the test mode. Once done, “bdt” will be
displayed in the control panel, the dispenser will turn to the number 3 position
and water will start to fill in the bleach compartment.
Press
start/pause to advance to the final stage of this test. Once done, “Fdt” will be
displayed in the control panel, the dispenser will turn to the number 4 position
and water will start to fill in the fabric softener compartment.
If at anytime during the test, the main water level is reached, the washer
will pump out the water and exit the test mode. Also, if you press power at
anytime it will exit the test mode.
Some GE front loader washer models
don’t have a dispenser motor but still have a dispenser test mode. Modes with no
dispenser motors have three water valves, one hot and two cold. The water valves
are energized in combinations to fill the correct dispenser compartment.
To enter the dispenser test mode on a GE front load washer, rotate the
control knob until t12 is displayed then press start/pause to enter the test
mode. Then “ddt” will be displayed and the hot water valve will run to fill the
detergent compartment.
Press start/pause to advance and “bdt” will be
displayed and the #2 cold water valve will run water into the bleach
compartment.
Press start/pause to advance, “Fdt” will be displayed, the
#1 cold water valve and the #2 cold water valve will run to fill the fabric
softener compartment.
Press start/pause to advance, “HCt” will be
displayed, the #1 cold water valve and the hot water valve will run to fill the
detergent compartment.
If at anytime the water reaches the main water level, the test will
stop.
Press power to exit the test mode and return to t12.
t13
This test has no diagnostic purpose.
t14
Spin Spin Ramp Test Mode
To enter the spin ramp teston a GE front load washer, rotate the control knob until t14 is displayed then press start/pause to enter the test mode. Once the test mode is entered, the spin basket will start to spin and the rpm will be displayed in the control panel. First, it will ramp to 100 rpm then to 350 rpm and finally to 1000 rpm.
Return From GE Front Load Washer Service mode