GE Washer Disassembly Guide
One of the most challenging things about do-it-yourself appliance repair is
dissembling the appliance to make the repairs. Luckily this GE washer
disassembly guide will walk you through this process step-by-step. So you can
use my repair guide to diagnose the problem and my GE washer disassembly guide
to help you replace the part.
If you need a part You can enter your
model number or part number here to search the part you need.
Should you have to remove the spin basket/tub to complete the repair you will
need a spanner wrench. The spanner wrench made by GE is around $50, which is
very expensive if you only plan to use it once. Here is a link to a spanner
wrench that is much cheaper that will work for GE washers.
Also see my GE washer disassembly video at the bottom of this page.
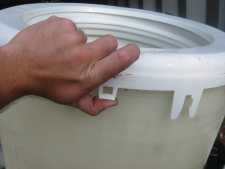
Top and front removal
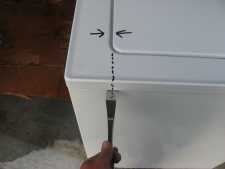
1. Remove the
front by pushing a butter knife (or anything flat, I usually use my truck keys)
between the top and the front in line with the grove in the lid as shown.
2. Remove the ¼ inch screws that hold the top on.
3. Remove the top.
Note that you have to remove the lid switch if your washer has a magnetic lid
switch and if it has a mechanical lid switch you must unplug it.

Agitator Removal
In this section of
this GE washer disassembly guide I will walk you through the steps in
disassembling the to replace the agitator-coupling.
1. The agitator just
lifts straight up and out. Note that it may be hard but if you can get your
fingers under it and rock it back and forth it will slip up. Also note that if
you are unable to get your fingers under it you can slip a belt under it and
pull from the belt.
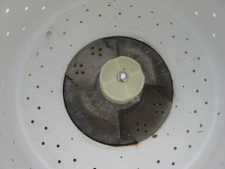
2. Under the agitator you should see the
agitator-coupling, remove it using a 7/16 socket.
Spin Basket Removal/Tub seal Replacement
In this section of this GE washer
disassembly guide I will walk you through the steps in disassembling the to
replace the tub seal.
1. Follow steps in top and front removal and
agitator removal.
2. Next remove the four 5/16 screws that hold the
damping straps on.

3. Unhook the drain hose on the bottom of the tub.
4. Unhook the small
water level tube on the left hand side.
5. Unplug the motor and remove
the ground screw.
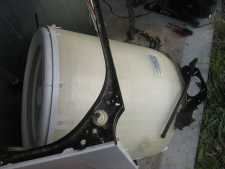
6. Lift up on the tub and unhook all four of the
suspension rods
7. Lift up on the whole unit and bring it out of the case bottom first as shown.
8. Remove the cover off of the tub as shown. Note be careful not to over bend
the tabs or it may not snap back in place.
Buy
appliance parts online and save.
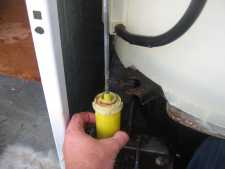
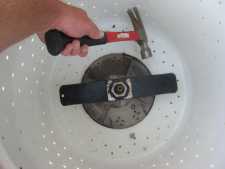
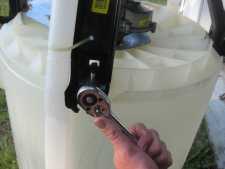
9. Remove the left-handed 1-11/16 hub nut. Note that
the tool shown is a spanner wrench designed for removing this nut and the part
number is WX5X1325. Also note that you may be able to remove this nut using a
wrench but typically they are too long so if you have to buy a tool to remove
this nut, buy the one I describe above.
Should you have to remove the
spin basket/tub to complete the repair you will need a spanner wrench. The
spanner wrench made by GE is around $50, which is very expensive if you only
plan to use it once. Here is a link to a spanner wrench that is much cheaper
that will work for GE washers.
10. Lift the spin basket up and out of the tub.
11. Remove the split ring. Note this split ring will break easily, so be
careful.
12. Remove the hub washer.
Note that at this point in
GE washer disassembly you can replace the tub seal. Just use a screwdriver to
prize the old one out. Then tap the new one in with a blunt object such as a nut
driver with out a socket making sure it is seated good.
Transmission Removal
In this section
of this GE washer disassembly guide I will walk you through the steps in
disassembling the to replace the transmission.
1. Follow steps in Top
and front removal, agitator removal and spin basket removal.
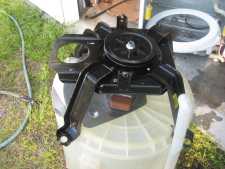
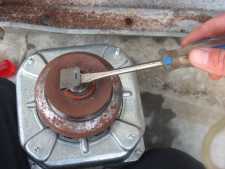
2. Turn the
unit over as shown.
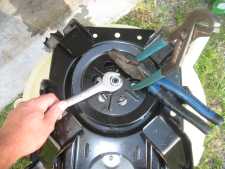
3. Remove the ¾ nuts holding the transmission pulley on. Note that you have to
somehow stop the pulley from turning in order to remove the nut. They make a
special tool for this but I do it the way shown without the tool. Also you can
also hold the belt by hand.
4. Remove the four 3/8 screws that hold the transmission to the to the platform.

5. Remove the ½ inch screws that hold the platform to the tub.
6. Lift
the platform up and off of the transmission.
7. Lift the transmission up and out of the tub.
8. Using a long
screwdriver knock the old tub seal out from the bottom of the tub.
Motor and clutch removal
1. Remove
the front as shown in the first step in front and top removal.
2. Remove
the 3/8-inch nuts under the motor.
3. Turn the transmission to allow you
to lean the motor back and slide it out.
4. To remove the clutch (not on
newer models) turn the motor over and remove the clip that holds the clutch on.
5. Lift the clutch up and off the motor shaft.
Return From GE Washer Disassembly Guide