Whirlpool Icemaker Repair Guide
In this Whirlpool icemaker repair guide I will walk you through the steps in
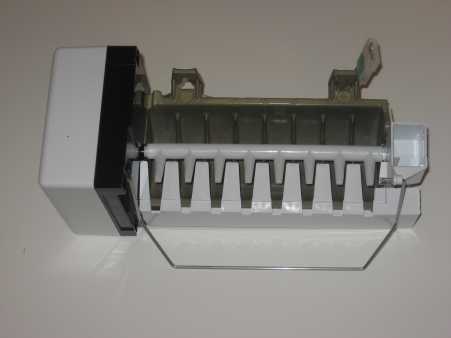
repairing Whirlpool icemakers with the module motor as shown in the picture
below. Note that this icemaker is on many brand refrigerators (most not made by
GE) and the procedure for checking them is the same. I will also discuss the
procedure for diagnosing the ice level control optics for whirlpool
refrigerators with the ice bin mounted on the freezer door. Whirlpool icemaker
repair is easy and with help from this Whirlpool icemaker repair guide you will
repair you icemaker yourself and save expensive repair bills.
When repairing icemakers it is important to know how much ice the icemaker should produce. Icemakers typically dump once every 1-2 hours An icemaker that dumps once an hour has strong icemaker production and an icemaker that dump once every 2 hours is weak but still acceptable. So in 24 hours, the icemaker should make approximately 80-175 cubes.
Typically it will take 24-48 hours for an icemaker bin to fill and longer if the refrigerator is just starting up. If your icemaker is producing ice but slowly, the first thing to check before going through troubleshooting steps provided on this page is the temperature in the freezer. The temperature should be around 0-10 degrees. Note that if you are taking air temperature, the door of the freezer should be closed for at least 30 minutes before reading temperature.
f you don’t have a thermometer, a good
indication that the temperature in the freezer is acceptable is ice cream. If
the ice cream is hard the temperature is acceptable and if the ice cream is soft
check out this page Refrigerator
Not Cooling.
Before you proceed in repairing your icemaker, take note of the temperature
inside the refrigerator, it should be between 0-10 degrees in the freezer and
34-40 in the fresh food section because this will greatly affect the performance
of the icemaker. If you have a thermometer to check temperature just make sure
all the food seems to be frozen and everything in the refrigerator seems to be
cold and if you are unsure, buy a thermometer. If you find that the refrigerator
is not cooling properly click
here
Special note for bottom freezers the icemaker may not
respond to the jumper wire test described below unless you close the door or
press the door switch.
Icemaker No Ice
This section of the
whirlpool icemaker repair guide I will walk you through the steps in a whirlpool
icemaker not making ice. First thing you should check is the feeler arm (not on
models with the ice bin mounted on the freezer door). The feeler arm is the
metal wire that stops the icemaker when the ice-bin gets full. Sometimes this
feeler arm will jump out of the hole on the back of the head of the icemaker so
that it will lift up and back down when the icemaker cycles. If it is out of the
hole, place it back and your problem should be fixed.
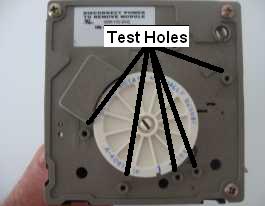
Most Whirlpool
icemakers have a motor modular mounted on the front of the icemaker with holes
marked V, L, H, T, M and N. These are test points to make Whirlpool icemaker
repair easy. To access this modular simply remove the cover off the front of the
icemaker, note that on some side-by-side refrigerators the icemaker is mounted
sideways and you must take the icemaker loose to remove the cover. To check this
icemaker you will have to make a jumper wire. Take a six-inch piece of insulted
wire and skin about ½ inch on each end. Now before you proceed, look in the ice
mold (where the ice forms). Is there any ice in it?
Yes
- If there is ice in the mold take that jumper wire and place one end
in the hole marked T and the other end in the hole marked H for about 15 seconds
then remove it.
If when you do this the icemaker dumps the ice in the
mold and the feeler arm lifts up and then back down, the thermostat inside the
icemaker is bad (provided the temperature in the freezer is ok). Note that I
recommend changing the entire icemaker if the thermostat is bad. Whirlpool
icemakers visit AppliancePartsPros.com.
If when you do this ice still will not dump, the motor
modular is bad and needs replacing (part number 8201515). If it dumps but the
feeler arm will not lift up and then back down make sure the feel arm hasn’t
jumped out of place, it should be inserted in a hole on the back of the icemaker
head.
No- If there is no ice in the mold take that
jumper wire and place one end in the hole marked V and the other end in the hole
marked L just long enough to see if water enters the icemaker then remove it.
This should power up the water valve and water should enter the icemaker.
If when you do this water doesn’t enter the icemaker, look inside the
tube that enters the back of the icemaker to bring water to it and see if it is
stopped up with ice. If so remove it, clean all the ice out of it and replace
the water inlet valve. If its not stopped up with ice, replace the water inlet
valve (provided the water supply from your house plumbing is working).
If when you do this water does enter the icemaker take that jumper wire
and place one end in the hole marked T and the other in the hole marked H for
about 15 seconds. When you do this, the icemaker should go through the cycle,
the feeler arm should lift up and the water should enter the icemaker. If all of
this happens the thermostat inside the icemaker is bad (provided the temperature
inside the freezer is ok). Note that I recommend changing the entire icemaker if
the thermostat is bad.
If the icemaker will not go through the cycle the
motor modular(part number 8201515) is bad and needs replacing. This part can be
found at AppliancePartsPros.com. If it does go through the cycle and run water in and the
feeler arm doesn’t lift up and then back down make sure the feel arm hasn’t
jumped out of place, it should be inserted in a hole on the back of the icemaker
head.
Note that the jumper wire test doesn’t work well with models that the ice-bin is mounted in the door. This is because you have to get everything exactly right for it to work. When I originally wrote about the jumper wire test I didn’t intend on it to be used on refrigerators with the ice-bin mounted on the door but it should work if you follow the instructions below. Also note on these models only try to jump out T to H.
1. Unplug the refrigerator for at least 30 seconds.
2. Insert the jumper from T to H and close the door. Note to be certin that the jumper stays in place or the test will fail.
3. Then after the jumper is in place plug the refrigerator back in and wait 15 seconds or so before opening the freezer door.
Using the jumper wire on the models with the ice-bin mounted in the door is not as effective as with models that have the ice-bin mounted in the freezer compartment such as older side-by-side models and all top freezers. It is mostly used just the make the icemaker cycle to see what it is doing or not doing.
But before you attempt to use any jumper on these models you need to check the optics as described below.
Special note for bottom freezers the icemaker may not respond to the jumper wire test unless you close the door or press the door switch.
Whirlpool Icemaker Repair-Optics Test
In this section of this
Whirlpool icemaker repair guide I will walk you though diagnosing the ice level
optics on Whirlpool refrigerators with the ice-bin mounted in the door. If you
have a whirlpool refrigerator with the ice-bin mounted in the door it will not
have the feeler arm, it will have an ice level control optics. The optics is
just two sensors, one on each side of the freezer and when ice gets high enough
to block the sensors it cuts the icemaker off. This part can be found at AppliancePartsPros.com. This is the test procedure for this Whirlpool icemaker.
1. First, open the freezer and look on the right-hand side and you
should see a blinking light.
A. If the light is blinking twice and then
off for one second repeatedly something is blocking the optics, which is normal
because when you open the door, a flapper springs out to block the optics so
that the icemaker will not dump when the door is open. Proceed to step 2.
B. If there is no light the icemaker is either in the harvest mode or
the optics are bad and need replacing. To check this, press in on the flapper to
unblock the optics. If when you do this the light flashes once every second the
icemaker is in the harvest mode and if not the optics are bad.
2. Next
press in on the flapper to unblock the optics.
A. If the light blinks
once followed by a one second delay, the optics are bad and needs replacing.
B. If the light is on continuously the optics are working properly.
C. If the light is still blinking the same as before you pressed the
flap the optics are bad.
If the optics passes the test the problem is
the icemaker or the water valve. To check this first, disconnect power from the
refrigerator then slide the icemaker out without unplugging it and remove the
cover off the front of the icemaker. Then take a six-inch piece of insulted wire
and skin about ½ inch on each end. Place one end of the jumper wire in the hole
marked H and the other end in the hole marked T. Next close the door to align
the optics and reconnect power. Wait 5 seconds then open the door and the
icemaker should have started the cycle if not replace the motor module (part
number 8201515). If the icemaker completes the cycle and no water enters the
icemaker the water valve is bad and needs replacing.
I hope this
whirlpool icemaker repair guide helped you in repairing your icemaker.
Return From Whirlpool Icemaker Repair Guide