Electronic Board Repair
Electronic board repair (or motherboard repair) can be very complicated and in most cases is not a do-it-yourself friendly repair; however there are a few common failures that you can repair yourself with help from this page and a few tools.
Identifying electronic boards
In the appliance world, we can break down the types of electronic boards into categories: main board, relay boards, logic boards and user interface boards.
On some appliances all of these boards are made together and others these boards are separated.
Logic Board
A logic board is where calculation and programming is done. These types of boards do not typically fail in a manner that is do-it-yourself friendly, so I will not talk about these boards on this page. This type of board is identified by having small chips, resistors and capacitors.
Relay Board
A relay board is a board filled with relays that are controlled by a main board. Often this board is made onto the main board, meaning all the relays needed are on the main board; therefore, there is no need for a separate relay board. These boards are identified by having large relays and some larger resistors and capacitors. These boards are the most common boards to have an easy electronic board repair.
User Interface
A user interface board is a board that receives input from the user. It then signals the main board telling it what the user intends to do, such as if you use bake or broil on your oven or you want to run a delicate cycle on the washer. Typically, there is only one user interface but on some appliances there can be multiple user interfaces.
Main Board
The main board uses the information given by the user interface and the logic board then energizes the relay board accordingly. Note that all of these types of boards can be made into one main board. It is very common to see the relay board, the logic board and the main board all in one and sometimes the user interface is also on the same made onto the same board.
Bad Solder Joint
Look for bad solder joints on the relay board or any board with large relays.
Solder joints are what hold all the components onto an electronic board and on relays that carry a lot of current (such as a bake unit relay) the solder joint will often fail.
A bad solder joint is the most common electronic board repair that can be performed yourself. If your appliance has a relay board (can be on main board as discussed above) that controls all components of the appliance and there is a problem check the failed component first then look for a bad solder joint.
For example, if your oven bake unit fails first, check for a bad bake unit or a loose connection and if you don’t find a problem then you can look for a bad solder joint.
First, disconnect the power to the appliance you are working on. Then locate the relay board; note that if there are large relays on the main board your appliance doesn’t likely have a relay board because all relays are located on the main boards.
Once you have located the relays, take note of the location of wires connected to the board. Take pictures or draw a diagram that shows how to reconnect the board.
Next, disconnect the board and look on the opposite side of the board for burnt or dry solder joints.
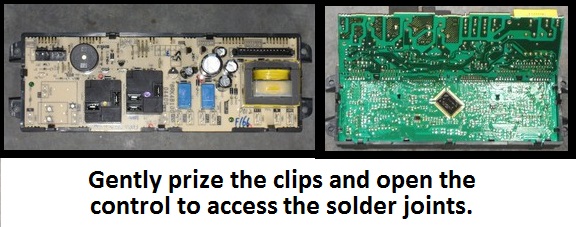
Some boards are encased in a plastic housing. On these controls you must gently remove the control from the housing to see the back side of the control. Be careful not to break the plastic housing because you will not be able to reinstall the board after the repair.
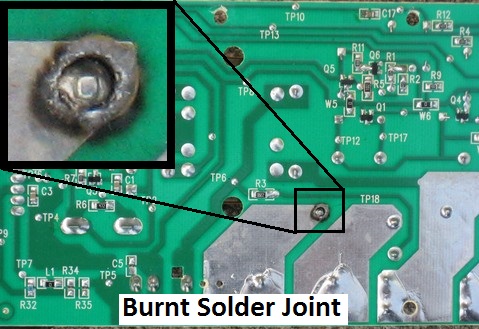
Burnt Solder Joint
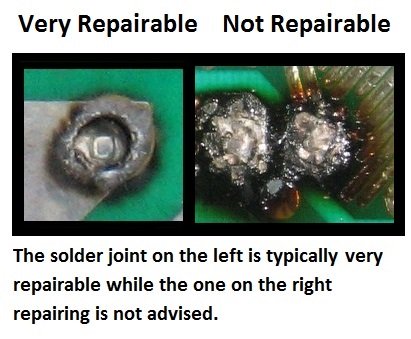
A burnt solder joint is easily spotted by a black burnt solder joint. In this case, you will have to evaluate the burnt spot on the board. Is the only thing damaged by the burnt solder joint is the solder joint itself? If there is more damage to other components on the board you will likely be better off replacing the board. If the only part that is damaged is the solder joint itself you can repair this (see section below).
Dry Solder Joint
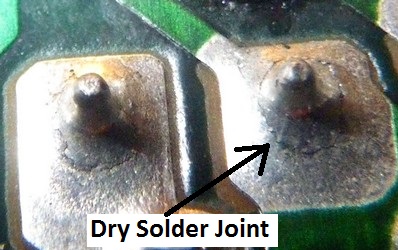
A dry solder joint is very hard to spot and you will likely need a magnifying glass. A dry solder joint is when a solder joint will crack all the way around the joint causing a break in the connection. This is often a cause for an intermitting issue because the crack will make contact sometimes and others it will not.
Repairing a Solder joint
Once you have found a bad solder joint, the electronic board repair is easy. All you have to do is solder the joint. Pick up a soldering iron and small diameter resin core solder. The resin core is a flux that blocks oxidation on the joint so that the solder will flow onto the joint and stick.
- First clean the tip of your soldering iron.
- Then get your soldering iron hot and coat the tip of the iron with solder
- Then heat the joint to be repaired.
- Now place solder on the joint opposite of the iron. This will make the solder run toward the iron because it is attracted to heat.
Everything you need can be found at your local RadioShack.
Things you don’t want to do…
You don’t want to put solder on the iron first when soldering because the resin will be burnt off and you will not get a good solder joint.
You don’t want to put the solder on the joint before it is heated because the solder will not stick.
You don’t want to use solder without flux because it will not stick. Resin core flux is recommended.
This is a very useful video I have found to help with electronic board repair.
Broken Conductor
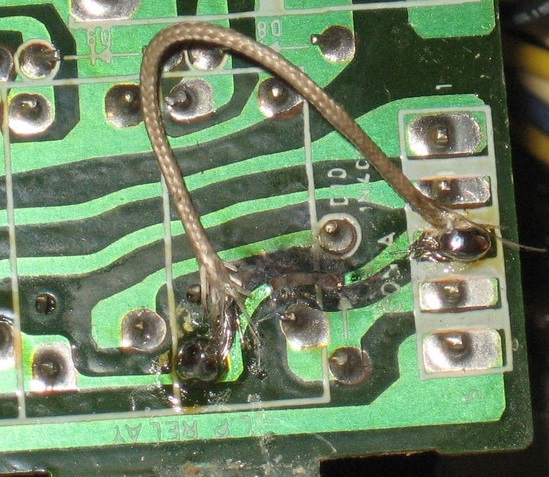
On electronic boards, there are little flat wires that carry current around the board and out to components on your appliance. Sometimes these flat wires will break causing the board will fail.
To fix this you can solder a jumper wire onto the board to replace the flat broken wire. To do this, trace the wire back to the nearest solder joint then trace back the opposite way to the nearest solder joint. You will then solder a jumper wire between these two solder joints. To do this, melt off the existing solder off of each joint, and then find a small wire that you can wrap around the pin. Solid wires are easier to handle but it can be hard to find a small solid wire so you can use stranded wire if you twist it tightly. Once you have the wire wrapped around the pin, use the same soldering technique outlined in the above paragraphs and the video.
Clean Ribbon Cable
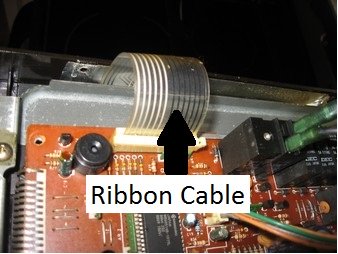
User interface boards are often connected to main boards by a flat cable called a ribbon cable. The flat cable has connections at the end of the cable that are inserted into a connector on the board. Sometimes this connection can become dirty and cause an unresponsive user interface. Cleaning the ribbon is an easy electronic board repair you can do yourself.
Locate the main board and look for a flat ribbon cable and unplug it. The standard way to clean this ribbon is to rub it with a pencil eraser. All you have to do is rub the connection end to clean it. This may fix your problem.
If this doesn’t work, it can be the user interface or the main control. This can be very difficult to figure out which one is the culprit.
Electronic Board Repair Beyond Your Abilities
If your electronic board is broken beyond your repair ability there are other options. You can have your board repaired professionally or you can replace the board. Sometimes boards are no longer available and sometimes they are very expensive in which case it may be best to have the board repaired.
FixYourBoard.com Is an
electronic board repair company that specializes in boards that are no longer
available. To have them repair your board the first thing to do is find the part
number to your board. Then check there website to see if your board is on the
list of boards they repair. If your board isn’t on the list contact them with
your part number to see if they can repair your board. Once you find your part
number on the list click on it and you will find the price for repairing your
board. This price includes return shipping and 2 years warranty.
Return From Electronic Board Repair