Fault Code Guide For GE Ovens And Ranges
GE ovens have fault codes sometimes called function error codes or F codes as a
part of a self-diagnosing system. If a problem is detected by the
self-diagnosing system a code will appear in the digital display of your
oven along with an annoying beep. In this section of my range repair guide I
have a full list of the fault codes along with the steps for you to follow in
order to repair your oven. So find the code that your oven is displaying read it
carefully and your oven will be repaired in no time.
F0
Stuck keypad - this may mean cannot turn off the oven. On some models, the
keypad and the control board are made together, if so replace control. If not
you need to figure out which one to change. First disconnect power then get to
the controls (on most ranges the back comes off, on ovens the front comes off).
Now you should see a ribbon that connects the keypad to the control board and
disconnect it. Then put the oven or range back together, reconnect power and
wait at least one day. If within that day the code comes back replace control
board or if the code doesn’t come back replace keypad. The control board and
keypad can be purchased at AppliancePartsPros.com.
F1
Failed transistor in control if you get this code the control board needs
replacing. Control boards can be purchased at AppliancePartsPros.com.
F2
The temperature in the oven reached over 590 degrees Fahrenheit with the door
unlocked or 930 degrees Fahrenheit with the door locked. First you need to check
the sensor, disconnect power, pull the range or oven out then take off the back
cover. Once off you should see the two small wires that are from the sensor then
you need to disconnect them (some have a plug but if you have to cut the wires).
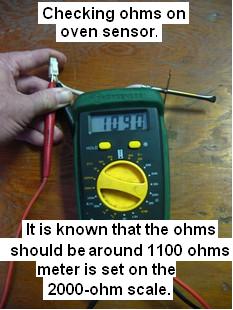
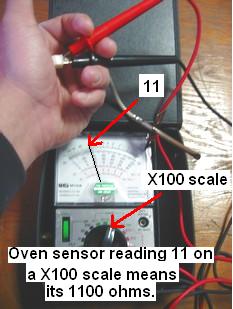
Now using your ohmmeter , measure resistance between the wires going to the
sensor. It should be somewhere between 1050 and 1150 ohms. Note that this test
should be done while the oven is at room temperature. If the resistance is not
within the range mentioned above, then replace the sensor. If resistance is
within range, replace the control board. Sensors and contorl boards can be
purchased at AppliancePartsPros.com.
 |
 |
F3
Open sensor circuit or intermitting sensor connection. First you need to
check the sensor, disconnect power, pull the range or oven out then take off the
back cover. Once off, you should see the two small wires that are from the
sensor and you need to disconnect them (some have a plug but if you have to cut
the wires). Now using your ohmmeter , measure resistance between the wires going to the
sensor. It should be somewhere between 1050 and 1150 ohms. Note that this test
should be done while the oven is at room temperature. If the sensor is open (or
not within that range) replace sensor, if not check the wiring between sensor
and control. If you don’t find any loose connections, I would recommend changing
the sensor even if it checks good cause it could be intermitting. Note that the
problem may be in the control board but the sensor is much cheaper, so it’s the
safe way to go. Sensors and control boards can be purchased at AppliancePartsPros.com.
F4
This fault code stands for shorted sensor circuit. First you need to check the sensor, disconnect power,
pull the range or oven out then take off the back cover. Once off, you should
see the two small wires that are from the sensor disconnect them (some have a
plug but if you have to cut the wires). Now using your ohmmeter , measure resistance between the wires going to the
sensor and it should be somewhere between 1050 and 1150 ohms. Note that this
test should be done while the oven is at room temperature. If the resistance is
not within that range replace the sensor. If the sensor checks good check to see
if the sensor or sensor circuit is grounded out using your ohmmeter, check to
see if there is continuity between the sensor wires and ground. If so, its
grounded out and replace sensor and/or sensor wires, if its not grounded out
replace control board. Sensors and control boards can be purchased at AppliancePartsPros.com.
F5
This fault code stands for failed transistor in control. Disconnect power for more than 30 seconds then
reconnect power. The code should be cleared, but if the code ever comes back
replace control board. Contorl boards can be purchased at AppliancePartsPros.com.
F6
This fault code stands for shorted start key. On some models the keypad and the control board are made
together, if so replace control. If not, you need to figure out which one to
change. First, disconnect power then get to the controls (on most ranges the
back comes off, on ovens the front comes off). Now you should see a ribbon that
connects the keypad to the control board and disconnect it. Then put the oven or
range back together, reconnect power and wait at least one day. If within that
day the code comes back, replace control if the code doesn’t come back, replace
keypad. Keypads and control boards can be purchased at AppliancePartsPros.com.
F7
This fault code stands for shorted function key. On some models the keypad and the control board are
made together, if so replace control. If not, you need to figure out which one
to change. First disconnect power then get to the controls (on most ranges the
back comes off, on ovens the front comes off). Now you should see a ribbon that
connects the keypad to the control board disconnect it. Then put the oven or
range back together, reconnect power and wait at least one day. If within that
day the code comes back, replace control if the code doesn’t come back, replace
keypad. Keypads and control boards can be purchased at AppliancePartsPros.com.
F8
EEPROM data error. The control board is bad and needs replacing. Control
boards can be purchased at AppliancePartsPros.com.
FF
Loss of door motor safety transistor. Replace control board. Control boards can be purchased at AppliancePartsPros.com.