HydroWave GE Washer Repair Guide
GE washer repair guide will walk you through the steps in repairing your
HydroWave washer. GE came out with the HydroWave around 2006 and is the quietest
washer on the market for the money. But as with all machines it sometimes needs
repair. This washer is basically like the older T model washers but without a
transmission that makes it much quieter. On this page I discuss HydroWave
washers that are not running.
If you need a part You can enter your
model number or part number here to search the part you need.
It’s easy! Just find the model number of the appliance you are working on. Next, type it in to the model number box and it will take you to an illustrated parts diagram for your appliance. Then just simply choose the part you need from the diagram. If you need help finding your model number click here
Hint: Some washers, beep every 20 seconds if the lid is open and on some models the washer will not fill with the lid open. Therefore, if you are hearing a beep and/or the washer will not fill skip to the lid switch section and check the lid switch.
Motor Error Codes
This section of my HydroWave GE washer repair guide will explain the motor error codes may point to your problem.
Note that after sometime in 2010 these washers will have a different
motor. This motor will basically be the same with a few changes. The light that
blinks will be red instead of green and you will have to view it from the side
rather than the front.

The 9 flash code will not occur because there is no brake resistor and there will be a 10 flash code. The meaning of the 10 flash code is explained below. Also there will not be a fuse harness on these models.
Error codes for the HydroWave washer will be displayed on the motor; it has a
built-in self-diagnostics system. These error codes were put in place to make
HydroWave GE washer repair easy. In this section there is a full list of error
codes and the steps to take when the error occurs. Many of these are simple
do-it-yourself GE washer repairs. On top of the motor there will be a cover,
underneath the cover there will be a blinking light.
If the
light isn’t blinking check the fuse and if it is bad replace it (see section on
the fuse below). If the light isn’t blinking and the fuse isn’t blown replace
the motor.
If the light is red or your motor has the flap shown in the
top picture your model doesn’t have the fuse.
This video shows each error code as it
appears on the motor. Use it along with the error code information below to help
diagnose and repair your washer.
If the self-diagnostics haven’t detected a problem, the light will flash in one-second intervals or .5 second intervals. Below is a list of codes the motors self-diagnostics will display. Note that when an error code is displayed, the light will flash the code and then be off for the remainder of the six seconds.
1 flash - This means that the tub took more than 25 seconds to stop. This code will shut down the motor so this code must be cleared for the washer to operate. Clear the code as described below. Once the error code is cleared, start a spin cycle and wait for the tub to reach full speed. Then open the lid, if the tub takes over 25 seconds to stop or if the same code reoccurs, replace the motor.
2 flashes - This means that the belt is slipping. If this
error code comes up, replace the belt then if the code reoccurs replace the
motor. Note that the belt will appear to be too short but it will stretch to
fit. This belt is probably harder to install than any other belt I’ve ever had
to install but this link should help GE HydroWave
Washer Belt Replacement Also note that if you get this code it could mean
that the hub nut (the nut that holds the spin basket) is loose. Remove the
agitator and the agitator coupling. Once done you should see the hub nut, make
sure it is tight.
Once the belt is replaced or the nut is tightened the
code must be cleared as described below. Also if the belt isn’t bad and the nut
isn’t bad try simply clearing the code.
3 flashes - This is a software problem - Clear the code and if problem still exist replace the motor.
4 flashes - Mode shifter circuit failed. If this error code comes up the motor will still operate but if the mode shifter circuit has failed the washer will not agitate properly. To check the mode shifter, first start the washer. Then when the washer starts agitating, look at the tub from the outside. If the whole inside tub is turning back and forth while in agitate, the mode shifter is bad. If the mode shifter is not bad then clear the code as described below and if the code reoccurs replace the motor. See the section on how to check the sifter coil below for more on this.
5 flashes - Clear code and if problem still exist replace motor.
6 flashes – This means that the motor cannot turn. Clear the code and if the problem still exists follow these instructions. To check, this first remove the belt and attempt to turn the big pulley. If it turns freely both ways replace the motor. If the big pulley, is stuck the shifter needs to be replaced.
7 flashes - This code will prevent the motor from operating. This means that you washed clothes four times and the lid switch never opened. Since you can’t wash clothes four times without opening the lid there is a problem. This can be that the motor is flagging this error code for no apparent reason or the lid switch is bad. There are instructions on how to test the lid switch below and if it fails the test replace it. If however the lid switch is ok clear the code as described below and if it continues to flag this code replace the motor.
8 flashes - The motor overheated. To check, this first
remove the belt and attempt to turn the big pulley. If it turns freely both ways
replace the motor. If the big pulley is stuck the shifter needs to be
replaced.
For most of these error codes I recommend simply clearing the
code to se if it will flag the code again but with this code it is best to go
ahead and replace the motor if the big pulley will turn freely. You don’t want
to mess around with an overheating motor.
9 flashes - The brake resistor failed. This code will limit the motor to 50 rpms. Try clearing the code and if the code comes back replace the motor.
10 flashes- This code means there is no communication
between the motor and timer/control board. If you have this code the timer or
control board (whichever one your model has) is most likely the problem. After
the repair is done the code must be cleared. Note that this code will only
appear on models made after sometime in 2010.
To clear the error code,
turn the washer off. Then disconnect power for about 20 seconds. Next, reconnect
power then open and close the lid five or more times within 12 seconds in the
first 30 seconds of power-up.
Note that after you clear the code
the washer may go back to work. This may be temporary and sometimes it is a
permanent repair. I recommend clearing the code and if the code reoccurs replace
the part suggested on this page.
All of these parts can be
purchased at AppliancePartsPros.com.
How To Check the Shifter Coil
(Sometimes called mode sifter or shaft
and tube)
This section of my HydroWave GE washer repair guide will
show how to check the shifter coil. All GE HydroWave washers have a shaft and tube as opposed to the old
transmission. How this works is there is a shifter that shifts the washer from
wash to spin mode. This is done with the shifter coil. The shifter coil is
basically a solenoid that pulls up a set of gears that lock into another set of
gears for wash mode and for spin mode it simply disengages. In other words, with
the gears disengaged the spin basket turns with the agitator and with the gears
engaged the agitator spins independently from the spin basket.
When the coil fails it can no longer engage the gears, therefore the gears stay disengaged all the time. This will cause the spin basket to turn with the agitator even during the wash cycle. This will make the washer become noisy during wash and it will not wash as it is designed to. Not to mention this is very rough on the machine in general because it is not designed to handle a full tub of water turning back and forth continually. Also this will cause motor to flag the four-flash error code, which stands for a failed shifter.
If your washer has the symptoms I described above more than likely the
sifter has failed but there is a very slim chance the motor is causing this
problem by not powering up the coil for wash mode. Check the sifter coil and if
it is bad replace it and if not replace the motor. Follow these steps to check
the sifter coil.
1. Disconnect power from the washer.
2. Remove the front off
the washer.
3. Disconnect the sifter coil from the motor. It will be the
only plug with only two terminals. It will also be the third plug from the left.
(see picture below)
4. Then test for continuity across the two wires.
You should get around 98 ohms, the important thing is if it is open or not. If
it is open replace the shaft and tube and if it is around 98 ohms replace the
motor.


Note that on the early models the motor can cause the shifter coil to fail under the right conditions. The short version of this is that there is two 30-second time frames during a cycle that if you opened the lid of the washer and left it opened for more than a few minutes the shifter would fail. This is was an algorithm problem in the motor control board (located on top of the motor). This only applies to motors with the following part numbers on the motor 175d516g014, 175d516g015, 175d516g016, 175d516g026, 175d516g027, 175d516g028, 175d516g029, 175d516g030, 175d516g031.If your mode shifter has failed and your motor has one of these part numbers, you will need to replace the motor and the shifter to correct the problem.
FUSE HARNESS
Note that all models made after sometime in 2010 will not have
this fuse.
If the light is red or your motor has the flap shown in the
top picture your model doesn’t have the fuse. (picture of motor at the top of
the page)
This section of my HydroWave GE washer repair guide will talk about the motor fuse and how it can be causing your problem. The fuse harness can cause the washer not to run and is an easy do-it-yourself GE washer repair. If the fuse harness is bad, the motor will not run in agitate or spin.

As you read this page you will learn that the motor has an electronic board with a flashing light. If the fuse is blown the flashing light will go out so if there is no flashing light the first thing to check is the fuse. However, if you do see a flashing light read the section below on error codes. To access the fuse harness, first disconnect power from washer and remove the front panel by depressing the two clips located between the top and the front. Once off, look to the right and you should see wires wrapped in tape, remove the tape. The fuse is on the white and red wire. Cut the fuse out leaving enough wire so that if the fuse is not bad, you can reinstall it with wire nuts. Now skin some of the wire on each side of the fuse. Then using your ohmmeter , check to see if you have continuity between the wire ends. If you do, the fuse is good, reinstall it. If you don’t have continuity, replace the fuse. Fuses for this washer can be purchased at AppliancePartsPros.com.
Method For Testing Fuse
This section of my HydroWave GE washer repair guide will
show how to check the fuse. You can check the fuse by cutting the wires and testing the fuse with an
ohmmeter. But if the fuse doesn’t turn out to be the problem you have to splice
the wires back. Here is a method for testing the fuse that doesn’t require
cutting the wires.
Unplug the washer and locate the neutral terminal on the power cord. If you
turn the plug to face you the neutral should be on the right and it should be
the large terminal. Some plugs have a little N over or beside the terminal.
On the motor there are four plugs. Disconnect the plug farthest left.
Place one lead of your ohmmeter on the neutral terminal of the power cord and
the other on the white/red wire of the motor plug. It should be the wire between
the green and the red/black wires. (See graphic below)
You should get continuity and if not the fuse is bad.

Lid Switch
Hint: Some washers, beep every 20 seconds if the lid is open and on some models the washer will not fill with the lid open. Therefore, if you are hearing a beep and/or the washer will not fill check the lid switch.
The lid switch will also cause
this washer not to run and is an easy do-it-yourself GE washer repair. If the
blinking light is flashing normal as described above, the lid switch could be
bad. To check the lid switch disconnect power from washer. Then cut the wires,
leaving enough wire to splice it back if it is not bad. Next using your
ohmmeter, check for continuity between the two wires going to the switch. If you
have continuity between the wires with the lid closed and then it is open with
the lid up, the switch is ok. Splice it back onto the washer. However, if the
switch is open (no continuity) with the door open and closed, the switch is bad
and needs replacing. The lid switch can be purchased at AppliancePartsPros.com.
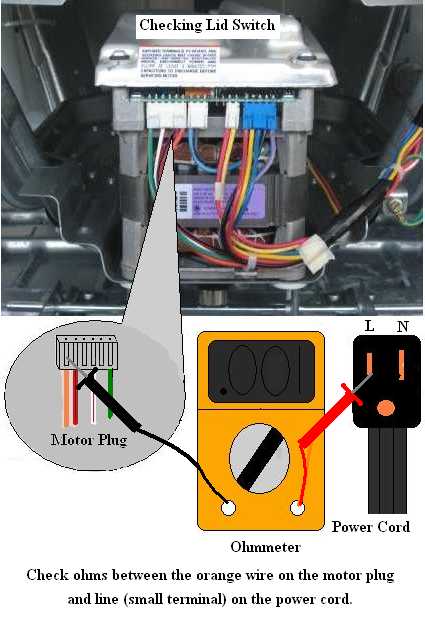
Method For The Lid Switch
This section of my HydroWave GE washer repair guide will
show how to check the lid switch. You can check the lid switch by cutting the wire and testing it with an
ohmmeter. But if the lid switch doesn’t turn out to be the problem you have to
splice the wires back. Here is a method for testing the lid switch that doesn’t
require cutting the wires.
Unplug the washer and locate the line terminal on the power cord. If you turn
the plug to face you the line should be on the left and it should be the small
terminal.
On the motor there are four plugs. Disconnect the plug farthest left.
Place one lead of your ohmmeter on the line terminal of the power cord and
the other on the orange wire of the motor plug. It should be the wire on the far
end directly opposite of the green wire. (See graphic below)
You should get continuity with the lid down and it should be open with the
lid up. If not replace the lid switch.
Note that these are not the only things that will cause a HydroWave GE washer not to run. For more on GE washer repair click here If you have figured out the problem with your GE washer but can’t seem to get it apart this page will help GE Washer Disassembly.
Return From HydroWave GE Washer Repair Guide